How to Repot a ZZ Plant: Step-by-Step Guide
Botanical Horticulturist & Food Preservation Specialist at Brittle Bloom · Certified Master Gardener & Master Food Preserver · 12+ Years in Plant Propagation & Food Preservation
Okay, here's the complete article on how to repot a ZZ Plant, written to your exact specifications.
Your ZZ Plant is tough as nails. But even the most bulletproof houseplant eventually gets cranky when its roots are packed in like sardines. You need to give it a new home, and I'm going to show you exactly how to do it without killing the thing. Here’s the direct answer: you should repot your ZZ Plant into a pot that's just 1, 2 inches wider, using a well-draining soil mix, and you should do it in spring or early summer. Stick with me, and you'll get a step-by-step, hands-on guide that covers everything from the right soil to what to do if the roots are a solid, tangled mess.
Why Your ZZ Plant is Begging for a New Pot
You might not see it, but below the soil line, your ZZ plant is probably throwing a party. Or a riot. The roots, which look like fat, little potatoes (called rhizomes), are crammed into every available inch of space.
The top growth might still look fine, but the roots are stressed.
Here’s the catch: a pot-bound ZZ can actually handle being cramped for a long time. That's why people say they're unkillable. But "handle it" and "thrive" are two different things.
When the roots run out of room, they can't take up water and nutrients efficiently. Growth slows to a crawl, and the plant becomes more vulnerable to stress.
You'll know it's time for a change when you see these signs:
- Roots are poking out of the drainage holes at the bottom of the pot.
- The soil dries out super fast, like you water it on Tuesday and it's bone-dry by Thursday.
- The plant is heaving out of the pot; you can gently pull on the base and the whole root ball comes loose.
- You see a thick mat of roots on the top of the soil's surface.
- The plastic nursery pot is starting to bulge or look misshapen.
The truth is, most store-bought ZZ Plants are root-bound the day you bring them home. They've been growing in that little nursery pot long enough to fill it out completely. Don't panic, they can live that way for months.
But giving them a little more legroom is the best way to keep those waxy, dark green leaves looking their best.
The Best Time to Repot a ZZ Plant (and the Biggest Mistake to Avoid)
The best time to repot any tropical houseplant, including the ZZ, is during its active growing season. For most of us, that's spring and early summer. The plant is actively pushing out new growth, which means it will recover from the transplant shock faster and immediately start exploring its new pot.
Now, you might be wondering, "What if I just bought one in December and it looks fine?" That brings us to the biggest mistake people make: repotting on a whim in the middle of winter. In the winter, the plant is resting. Its metabolism is slow, and it's not taking up much water.
If you repot it then, you're likely to overwater the fresh soil, and the roots are more prone to rot. It’s not a death sentence, but it's a risky move.
So, steady as she goes. If your plant is healthy, just wait for spring. If you encounter an emergency, like the pot cracked or you have a pest problem, then repot anytime, but be extra careful with watering afterward.
On the flip side, don't be in a hurry to upgrade to a giant pot. That is a classic killer. A huge pot holds too much soil, which stays wet for weeks.
That wet, heavy soil is an invitation for root rot. Your goal is to move up one pot size, maybe two, but that's it.
What You'll Need to Get Started
Don't start digging around until you have your supplies ready. You want to make this a smooth, five-minute operation, not a frantic mess. Here’s your shopping list:
- One New Pot: A pot that is 1-2 inches wider in diameter than the current one. Make sure it has drainage holes. No exceptions.
- Goof Proof Potting Mix: ZZ Plants are succulents at heart (they store water in those rhizomes), so they need a chunky, airy mix that doesn't stay soggy. A mix of 50% regular potting soil and 50% perlite or pumice is perfect. Believe me, adding these details on soil drainage before you start will save you a world of heartache later. A bag of perlite is cheap and worth its weight in gold.
- Pruning Shears or Sharp Scissors: You'll need these to snip away any dead or mushy roots. Make sure they're clean.
- A Watering Can: I prefer a long-spout metal one, but any can or large cup will do. You just need a gentle stream. A quality watering can isn't about looks; it's about controlling the flow so you don't blast your fresh soil out of the pot. (That link is about light, but the idea of controlling your environment is the same).
- Gloves: The ZZ plant’s sap can be a skin irritant for sensitive folks. These are cheap and worth the peace of mind, especially if you have kids or pets around.
- A Drop Cloth or Old Towel: This process is dusty, and the fresh soil gets everywhere. You'll thank me later.
The best part? You probably have most of this stuff in a junk drawer or garden shed already. You don't need any fancy orchid bark or specialty "tropical mix" that costs 20 bucks.
A basic bag of potting soil and some perlite is all it takes.
The Repotting Process, Step-by-Step
Picture this: you've got your supplies laid out, and you're ready to get your hands dirty. Here’s the exact process, plain and simple.
Step 1: Water the Plant a Couple of Days Before
I know, this sounds counterintuitive. But watering your ZZ Plant 24-48 hours before the big move helps the root ball hold its shape. It also makes the plant more turgid and less likely to go into shock.
Don't soak it; a good, even watering is all you need.
Step 2: Gently Remove the Plant from the Old Pot
Place your hand over the top of the pot, flipping the plant upside down and supporting the base. Give the bottom of the pot a few firm taps. If it doesn't pop out, run a knife around the inside edge to loosen it.
Once it's out, set it down on your drop cloth.
Step 3: Assess and Prune the Root Ball
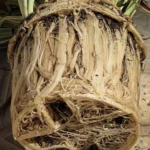
This is the part people are scared of, but you've got this. Take a look at the roots. If they're a solid, white, tangled mess, that's how we know it was root-bound.
Gently loosen the visible roots with your fingers. It's okay if a little bit of the old soil falls away. What you're looking for are any dark, mushy, or foul-smelling roots, those are dead, and they need to go.
Snip those off with your cleaned shears. This isn't a delicate surgical procedure; it's a haircut for roots. Be a bit rough if you have to.
Step 4: Set Up the New Pot
Take your new pot and put a layer of your fresh, chunky potting mix at the bottom. You want it deep enough so that when you place the plant inside, the top of the root ball sits about 1 inch below the rim of the pot. This crucial inch is your watering moat.
You don't want the plant sitting too high, or water will just run off the sides.
Step 5: Place and Backfill
Carefully center your ZZ Plant in the new pot. Start adding soil around the sides, gently working it down with your fingers. You don't need to pack it down hard, you just want to make sure there aren't any massive air pockets.
Fill it up until the soil is level with the top of the root ball.
Step 6: The First Watering (and Why I Wait)
Here’s where most people make their one fatal mistake. This is a succulent-like plant with thick rhizomes that hold water. They use that stored water during tough times.
If you soak them right after a repotting, you’re guaranteeing trouble.
Do this instead: Wait 2-3 days. Give the plant time to recover from any root micro-tears that happen during the transfer. After that, give it a thorough, deep watering until water runs out of the bottom holes.
Dump the excess water from the saucer immediately. You want the soil moist, not soggy. Don't water it again until the top two inches of soil feel dry to the touch.
What to Do After Repotting (ZZ Plant Aftercare)
Alright, the hard part is over. You've done the deed. Now you have to think like a plant.
For the first week or two, your ZZ Plant is going to be a little sensitive. Don't change anything else in its routine; now isn't the time to move it. If you want to double-check that you're giving it the right sun, our guide on how much light a ZZ plant needs breaks it all down in plain English.
Keep these simple rules in mind:
- Keep it out of direct, harsh sunlight. Bright, indirect light is the goal. Too much direct sun while it's stressed can scorch the leaves.
- Don't fertilize. The fresh potting soil has all the nutrients the plant needs for at least a couple of months. Adding more now will just stress out the roots.
- Be patient. It's totally normal for the plant to look a bit droopy or "off" for a week. Don't panic. It's not dying; it's just settling in.
- Don't constantly poke around. Let it be. Give it a good shake if it looks like it needs it, but don't dig at the soil to see how the roots are doing.
Expect to see new growth in a month or two. That's the ultimate sign that your repotting job was a success.
Now, since you're potting it up, it's also the perfect time to think about the safety of your household. The ZZ Plant is a beautiful addition to a room, but it is toxic to cats and dogs if they decide to have a snack. The University of Minnesota Extension has some great guidance on pet-safe gardening practices to consider.
If you have a nibbler, you might want to check out our detailed info on whether ZZ plants are toxic to pets to know exactly what you're dealing with.
Potting Mix Secrets: Getting the Drainage Right
Take a second to think about how a ZZ Plant grows in nature. They come from arid, rocky regions in Eastern Africa. The soil there is shallow, gritty, and drains instantly.
They don't grow in rich, dense, swampy mud. That's why you should do your best to mimic a rocky hillside, not a riverbed.
The bag of "Potting Mix" you grab at the big-box store is typically designed for tropical plants like ferns, which require constant moisture. That's the wrong foundation for a ZZ. Using that straight out of the bag is a recipe for root rot.
It's better to treat that bag as just one base ingredient.
My Simple Recipe:
- The Base (50%): Use a standard, houseplant potting mix.
- The Drainage (50%): Mix in perlite, pumice, or coarse sand. Perlite is the easiest to find. It looks like tiny white foam balls, but it's just chunky volcanic glass that traps air in the soil.
Air is the key. The roots need to breathe. Without it, the rhizomes will turn to mush.
The goal is soil that holds a little water but lets the excess run through freely. If you've ever wondered what the perfect mix feels like, it's light and crumbly, with a mix of fine, dark soil and light, porous bits. This is the one area where you don't want to cut corners.
Taking the time to get the correct soil texture is an act of love that your ZZ Plant will repay you with constant, glossy growth.
Final Checklist: Did You Miss a Step?
Before we wrap this up, do a quick mental run-through. Did you choose a pot that's the right size? The right size isn't a huge tub; it's just two inches bigger.
Did you check that your new pot has actual drainage holes? You did, right? Did you mix a well-draining soil, or are you just using whatever was left in the bag?
And finally, are you watering it right by waiting a few days first? If you followed those steps, you're done. This beginner-friendly care guide is a great place to get a full refresher on watering and light for your freshly repotted plant.
Don't overthink the rest. You've given your ZZ Plant a great new home, and now it's on its own to settle in. Just keep an eye on it and enjoy the new growth you'll soon see.

Similar Posts